
Do you have a situation where you need to remove the background of an image but don’t want to lose its quality? Yes, Photoshop is the perfect tool that can help you achieve this. Photoshop has a lot of tools that not only help you remove the background of an image but also help you erase particular text on an image.
Without wasting any time, let’s get down to it with two simple steps
What is Photoshop
Adobe Photoshop, often referred to as Photoshop, is a raster graphics editor developed and published by Adobe Inc. for macOS and Windows. It is the industry standard for digital image editing and has been used by professional photographers, graphic designers, and artists for decades.
Photoshop allows users to create, edit, and manipulate images using a wide range of tools and features. These include tools for selecting, cropping, resizing, rotating, and transforming images, as well as tools for adjusting brightness, contrast, color, and saturation. Photoshop also includes a variety of filters and effects that can be applied to images to create unique and artistic effects.
In addition to its image editing capabilities, Photoshop also offers a variety of tools for creating and editing vector graphics, such as shapes, lines, and text. This makes it a versatile tool for creating a wide range of digital content, including logos, illustrations, and website graphics.
Overall, Photoshop is a powerful and versatile tool that is used by professionals to create and edit digital images. It is the industry standard for digital image editing and is essential for anyone who wants to work with images in a professional capacity.
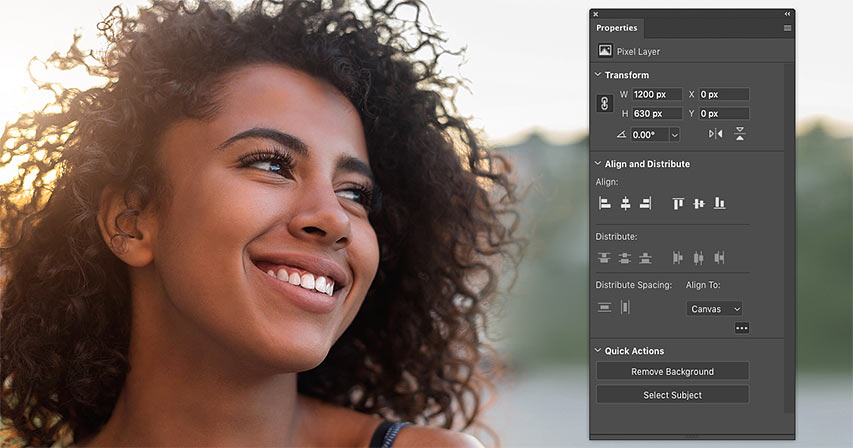
Simple Steps to remove background and image
- Open the image in Photoshop.
- Go to the Layers panel on the right-hand side.
- Now duplicate the layer by pressing CTRL+J or Command+J (MacOS).
- Go to Windows at the Menu bar and select properties. You should be able to see an option to remove the background under the Quick Action
- Click on Remove background and wait for a few seconds.
- You will be able to see your image on the layer panel without a background.
- You can use the move tool to view the new image without a background simply by selecting the move tool on the tool panel by the left (usually the first). Right-click on the image and hold, then move with it to see the newly created image
- Click on the other layer background to delete it.
- You will now see your image without a background which can now be saved in a Portable Network Graphics (PNG) format.
NB:
In case you do not see the option to remove the background in the properties section, go back to the layer containing the image then right-click, scroll down, and select Rasterize. You can then go back and repeat from step (4).
Learn more: Basic Photoshop tools and their uses
Leave a Reply