Introduction on what are the Different Photoshop tools and their Uses
Welcome to another interesting topic which covers all the different Photoshop tools and their use. But before we move to properly study all this tools it important that we have a general understanding of what we are to study. Trying to figure out what are the Different Photoshop tools and their Uses, it also important to know what Photoshop is all about. Adobe Photoshop as it is commonly called is a widely used image editing software that provides a vast array of tools to enhance, manipulate, and create digital images. These Photoshop tools cater to various editing needs, from basic adjustments to advanced image transformations. Photoshop have tools which are available on a tool bar with each having it specific use. Some of the Photoshop tools include: Line tool which is use to draw line, Rectangle tool use to draw rectangle, ellipse tool use to draw circles, etc. These are just few of them. We are have explained all of the different tools and their uses somewhere in this article. You can equally find Photoshop experts at WandaConnect in case you want to design anything or get more inquiries about Photoshop. You can equally join the WandaConnect freelancing platform to sell your skills by providing solutions to simple tasks.
What is Photoshop?
Adobe Photoshop is a raster graphics editor developed and published by Adobe Inc. for Windows and macOS. It was originally created in 1987 by Thomas and John Knoll. Since then, the software has become the most used tool for professional digital art, especially in raster graphics editing.
What is the meaning of Raster Graphics
Raster graphics as used above, is a type of digital image that uses tiny rectangular pixels arranged in a grid formation to represent an image
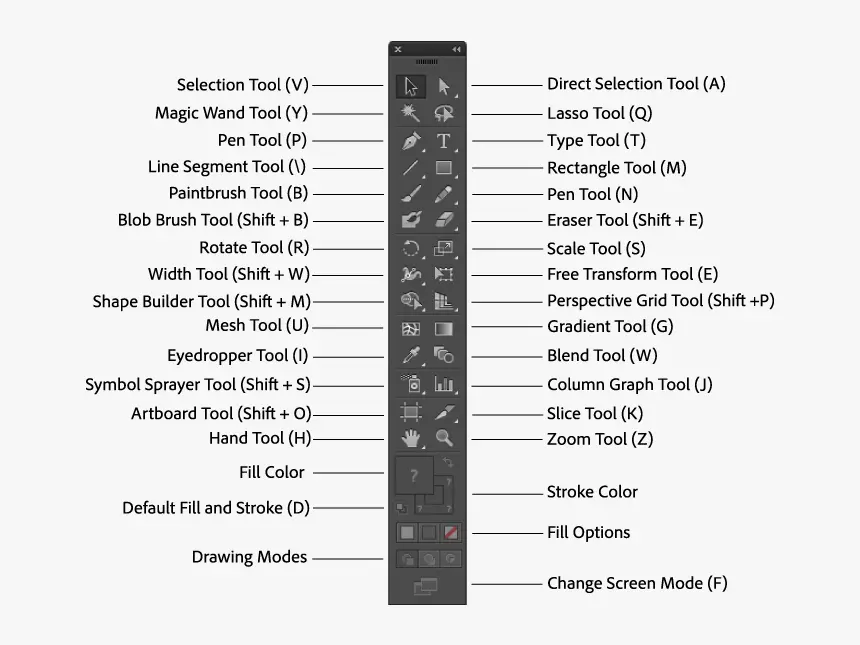
What are the Different Photoshop Tools and their Uses?
Photoshop tools can be sub divided into categories according to the way in which they been used. This is to make it easy for the designer to be well informed and to know what tool to use at a particular time.
First in the list is the default tool. Default tools are those that are initially displayed in each spot in the toolbar and are known as default tools. For example, we have the Rectangular Marquee Tool is the default tool for the second spot from the top. But Photoshop won’t always display the default tool. Instead, it will display the last tool you selected.
Move and Selection tools
The move and selection tools are used to move elements from one place to another and to select elements respectively. Some examples of these tools include:
Move tool(V): The Move Tool as the name sounds is used to move layers, selections and guides within a Photoshop document. Enable “Auto-Select” to automatically select the layer or group you click on.
- Elliptical Marquee Tool ( M ): This Tool is use to draw elliptical selection outlines. Press and hold Shift to draw a selection in a perfect circle.
- The Lasso Tool * ( L ): With this Tool, you can draw a freeform selection outline around an object.
- Polygonal Lasso Tool ( L ): When this tool is selected, click around an object with the Polygonal Lasso Tool to surround it with a polygonal, straight-edged selection outline.
- The Magnetic Lasso Tool ( L ): We also have the Magnetic Lasso Tool which snaps the selection outline to the edges of the object as you move your mouse cursor around it.
- Object Selection Tool * ( W ): Furthermore, we have the Object Selection Tool which lets you select an object just by dragging a rough selection outline around it.
- The Quick Selection Tool ( W ): This tool lets you easily select an object simply by painting over it with a brush. It Enable “Auto-Enhance” in the Options Bar for better quality selections.
- Magic Wand Tool ( W ): The Photoshop’s Magic Wand Tool selects areas of similar color with a single click. Also, the “Tolerance” value in the Options Bar sets the range of colors that will be selected.
Crop and Slice Tools
The crop and slice tools in adobe Photoshop are used to crop an image and remove unwanted areas from it. Some of these tools include:
- The Crop Tool itself * ( C ): This tool is use to crop an image and remove unwanted areas. To use this tool, Uncheck “Delete Cropped Pixels” in the Options Bar to crop an image non-destructively.
- Perspective Crop Tool ( C ): The perspective tool is use to both crop an image and fix common distortion or perspective problems.
- We also have the Slice Tool ( C ): The Slice Tool divides an image or layout into smaller sections (slices) which can be exported and optimized separately.
- Slice Select Tool ( C ): Furthermore, we also have the Slice Select Tool to select individual slices created with the Slice Tool.
- Frame Tool * ( K ): New as of Photoshop CC 2019, this Tool lets you place images into rectangular or elliptical shapes.
Measurements Tools
Adobe Photoshop have many measurement tools that give precise dimensions some of which include:
- Eyedropper Tool * ( I ): The Photoshop’s Eyedropper Tool samples colors in an image. You can Increase “Sample Size” in the Options Bar for a better representation of the sampled area’s color.
- 3D Material Eyedropper Tool ( I ): This tool is use to sample material from a 3D model in Photoshop.
- Color Sampler Tool ( I ): Equally, we have the Color Sampler Tool that displays color values for the selected (sampled) area in an image. With this tool, up to four areas can be sampled at a time.
- Ruler Tool ( I ): This tool can be use to measure distances, locations and angles. The Ruler Tool is great for positioning images and elements exactly where you want them.
- Note Tool ( I ): This tool allows you to attach text-based notes to your Photoshop document, either for yourself or for others working on the same project. These Notes are saved as part of the .PSD file.
- Count Tool ( I ): The count tool is use to manually count the number of objects in an image, or to have Photoshop automatically count multiple selected areas in the image. What are the Different Photoshop tools and their Uses
Navigation Tools
Some examples of Navigation tools include:
- Hand Tool * ( H ): The Photoshop Hand Tool lets us click and drag an image around on the screen to view different areas when zoomed in.
- Rotate View Tool ( R ): This tool can be use to rotate the canvas so you can view and edit the image from different angles.
- Zoom Tool * ( Z ): Click on the image with the Zoom Tool to zoom in on a specific area. To use this this tool, press and hold Alt for Window users and Option for Mac users and click with the Zoom Tool to zoom out. What are the Different Photoshop tools and their Uses.
Drawing And Type tools
Some of the drawing and type tools include:
- Pen Tool * ( P ): The Photoshop’s Pen Tool allows you to draw extremely precise paths, vector shapes or selections.
- Freeform Pen Tool ( P ): This Photoshop Tool allows you to draw freehand paths or shapes. Anchor points in Photoshop are automatically added to the path as you draw.
- The Curvature Pen Tool ( P ): The Photoshop Curvature Pen Tool is an easier, simplified version of the Pen Tool. It was introduce earlier as of Photoshop CC 2018.
- Add Anchor Point Tool: This tool is use to add Anchor Point Tool to add additional anchor points along a path.
- Delete Anchor Point Tool: To use this tool, click on an existing anchor point along a path with the Delete Anchor Point Tool to remove the point.
- Convert Point Tool: On a path in your Photoshop document, click on a smooth anchor point with the Convert Point Tool to convert it to a corner point. Click a corner point to convert it to a smooth point.
- Horizontal Type Tool * ( T ): This tool is known simply as the Type Tool in Photoshop, always use the Horizontal Type Tool to add standard type to your document.
- Vertical Type Tool ( T ): This Tool adds type vertically from top to bottom.
- Rectangle Tool * ( U ): The Rectangle Tool in Photoshop is use to draw rectangular vector shapes, paths or pixel shapes, with sharp or rounded corners. Always Press and hold Shift as you drag to force the shape into a perfect square.
- Ellipse Tool ( U ): This tool is use to draw elliptical vector shapes, paths or pixel shapes. Press and hold Shift as you drag to draw a perfect circle.
- Triangle Tool ( U ): Photoshop Triangle Tool draws triangle shapes. Hold Shift to draw an equilateral triangle, or use the Radius option to round the corners.
- Polygon Tool ( U ): This Tool draws polygonal shapes with any number of sides. You can use the Star Ratio option to turn polygons into stars.
- Line Tool ( U ): The Line Tool draws straight lines or arrows. Furthermore, use the Stroke color and weight to control the appearance of the line.
- Custom Shape Tool ( U ): Photoshop’s Custom Shape Tool lets you select and draw custom shapes. Choose from Photoshop’s hundreds of built-in custom shapes or create your own. What are the Different Photoshop tools and their Uses
Thanks for reading. You can read some interesting topics like
How To Delete An Image From The Upload Folder
How To Send Emails Directly from a form with PHP mail Function
Simple Steps to upload a file to the Server with Php with Sample Codes
Leave a Reply