
With the frequent update of the Elementor plugin, certain features have been removed from the updated version and new features added. Nevertheless there are still some features which designers have been requesting to the Elementor community to add in the new update link the stretch section, inner section, etc. If by any chance you landed on this page then you are about to get the solution. Before we begin, let us give a brief on what Elementor is all about and what is it used for.
What Is Elementor?
Elementor or Elementor page builder is a WordPress page builder plugin that allows users to create and design customer websites without having to code. It comprises of a drag-and-drop interface which makes it easier to add elements on a page.
More so, it integrates with various third-party plugins and services, providing users with even more customization options. It is also compatible with most WordPress themes, making it a versatile choice for website builders. This builder has some key feature which is;
- Drag-and-drop interface: Allows users to easily add and arrange elements on their pages.
- Pre-designed templates and widgets: Provides users with a starting point for creating their own designs.
- Third-party integrations: Integrates with various plugins and services for added customization options.
- Responsive design: Ensures that websites created with Elementor are mobile-friendly.
- Live editing: Allows users to see changes to their designs in real-time.
- Version control: Allows users to revert to previous versions of their designs.
Overall, Elementor is a powerful and user-friendly page builder plugin that is perfect for creating custom WordPress websites without the need for coding knowledge.
If you are also new to Elementor page builder then let us talk on its installation and how to use.
How to install Elementor page builder
- Login into you dashboard, go to plugin>add new. Search for Elementor at the top right search bar.
- Install and activate the Elementor plugin.
- Got to pages>add new. Enter the page title (e.g Contact) or edit and existing page by going to pages>All pages, click on the page you wish to edit
- Click on the “Edit with Elementor” button to launch the Elementor editor.
- Once in the editor, you can start building your page by using the dragging and dropping elements from the sidebar on your left.
- You can fully customize each element (widget) by editing its content. You can style and change settings using the options on the sidebar.
- You can also add sections, widget, and columns to create different layouts to be used.
- You can preview you changes by navigating to the page you create, example www.website.com/contact
- You can also make the layout or design be responsive on different device
- At the end of it all, click on ‘PUBLISH‘ button to save your changes.
In the above statements we talk about widget so let us explain what a widget is
What is an Elementor Widget?
It is a small, self-contained element that can be added to a website’s page using the Elementor page builder. They are the building blocks of a website design and can be used to add various types of content and functionality to your pages. Some of these widgets include elements such as headings, text editor, spacer, images, buttons, inner section, forms, icons, videos, divider, maps, and more. Each of this widget serves a specific purpose and can be customized to fit your design needs. With the help of Elementor widget you can create custom layout and design for a WordPress website without having to code it or have any knowledge in coding
Some Examples of Elementor Widgets and how to use them
Below are some common widgets and their possible uses
- Text Editor: This widget allows you to add and format text on your page. You can use it to create headings, paragraphs, and other text content.
- Image: The image widget allows you to add images to your page. You can use it to showcase products, portfolio items, or any visual content.
- Button: The button widget is used to create call-to-action buttons that link to other pages or external URLs.
- Video: With the video widget, you can embed videos from platforms like YouTube or Vimeo directly onto your page.
- Icon Box: This widget is used to display icons along with a title and description. It’s great for highlighting features or services.
- Testimonial: The testimonial widget allows you to showcase customer testimonials or reviews on your website.
- Progress Bar: You can use the progress bar widget to display progress indicators for skills, achievements, or other metrics.
- Form: The form widget lets you create and customize contact forms, subscription forms, or any other type of form for user interaction.
- Google Maps: This widget allows you to embed interactive Google Maps on your website.
You can find more and more interesting widgets on your way as a designer
How to Stretch a Section In Element
The new Elementor doesn’t have an option to stretch a section but it has provided the option to return back to the previous version, meaning you get to see and use all the widgets that we not added in the new Elementor. To activate the feature we will do the following
- Log into you WordPress dashboard and install Elementor, then active,
- After activation, look on the left side, hover on Elementor and click on settings,
- From the headings given, click on Features,
- Scroll down and search for Flex box Container, set it to Inactive
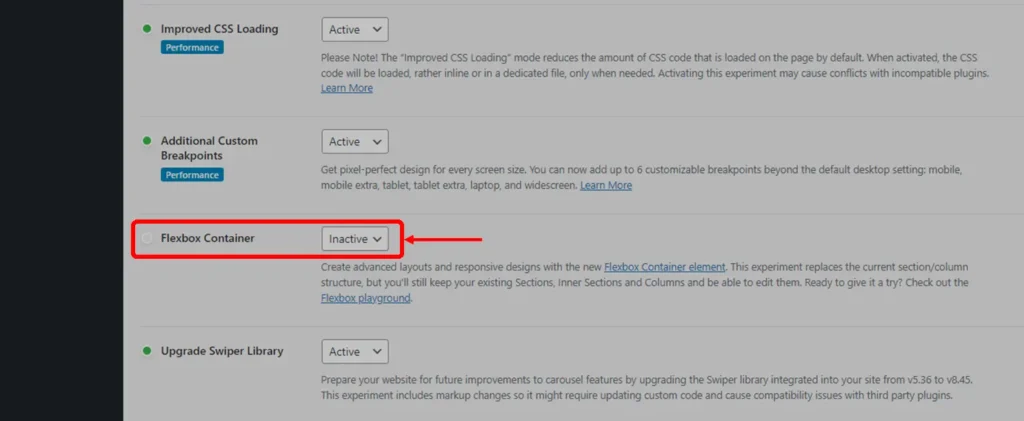
The above steps should return all the old features that we missing. You can now start building your pages and creating your designs like before.
NB:
If you already started using the new Elementor and you switch this to Inactive, all saved work or tags you built will be deleted so its best you do this first before you start Building.
Leave a Reply