
Introduction
You must be wondering when you highlight a word or letter on MS Word and click the bold (B) is automatically changes weight right? Well there’s no big deal in it as today we will be building out own personal text editor
What Is a Text Editor and how does it function
Before we commerce, it is how ever best we understand what a text editor is and how it functions.
A text editor is a computer software program that edits plain text. It is a program that allows a particular user to create and edit files by providing a user interface for entering and editing the data. With text editor, a user can also save the updated or newly created data. Most editors are used for creating scripts (Notepad), writing documents (MS word), etc.
Today, different editors have different characteristics and used with some ranging from spell checking, code compilation and debugging, highlighting
How to Create a Text Editor
To begin with our awesome text editor, we will be using the following programming languages
- HTML
- CSS
- JavaScript
HTML helps us build the interface, CSS with styling (decoration), and JavaScript with functionalities
Steps Involves
For our functionalities with JavaScript, we will be using the popularly known method HTML DOM Document execCommand()
- Creat a blank HTML page (lets call it editor.html)
- Add a fieldset with some buttons in it
- Create another fieldset after the first one and give it a classs (say editor), make the content editable (contenteditable=”true”)
- Now add some styling to the buttons, fieldset and editor class using any for of CSS (Inline, internal, External)
Sample code
<fieldset class=”butn”>
<button>Italic</button>
<button >Bold</button>
<button>Underline</button>
</fieldset>
<fieldset class=”editor” contenteditable=”true” name=”message”>My Text Editor</fieldset>
Now we can fully bring in our HTML DOM Document execCommand() and place them on out buttons
Sample code
<fieldset>
<button onclick=”document.execCommand(‘italic’,false,null);” title=”Italize Text”><i>I</i></button>
<button onclick=”document.execCommand( ‘bold’,false,null);” title=”Bold Text”><b>B</b></button>
<button onclick=”document.execCommand( ‘underline’,false,null);” title=”Underline Text”><u>U</u></button>
<fieldset>
You can add as many stylings as you want. The above command also works for spell check should in case you wanted to add it
Let us write down the full code with stylings, and functionalities
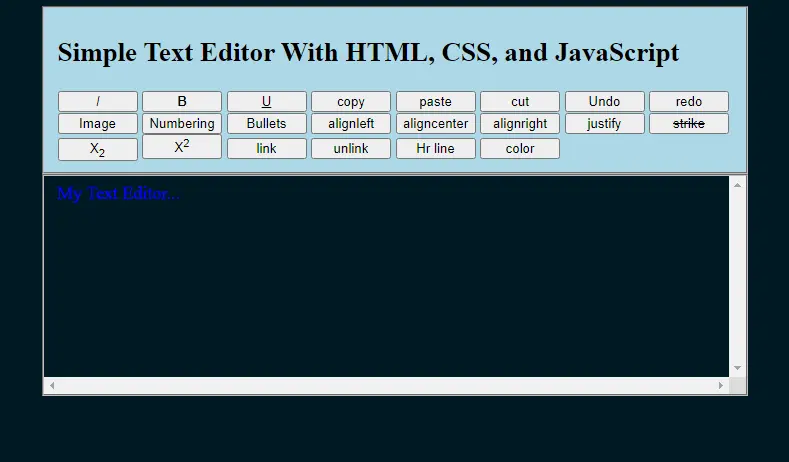
Full Script
<!DOCTYPE html>
<html>
<head>
<meta charset=’utf-8′>
<style>
body {
font-size: 18px;
background: rgb(0, 25, 34);
}
.editor {
width: 50%;
margin:auto;
height: 200px;
color:blue;
}
fieldset {
margin: auto;
width: 50%;
overflow: scroll;
}
.butn{
margin: auto;
width: 50%;
overflow: unset;
background: lightblue;
}
button {
width: 80px;
text-align: center;
padding: 1px 3px;
}
</style>
</head>
<body>
<fieldset class=”butn”>
<h2>Simple Text Editor With HTML, CSS, and JavaScript</h2>
<button onclick=”document.execCommand(‘italic’,false,null);” title=”Italize Text”><i>I</i></button>
<button onclick=”document.execCommand( ‘bold’,false,null);” title=”Bold Text”><b>B</b></button>
<button onclick=”document.execCommand( ‘underline’,false,null);” title=”Underline Text”><u>U</u></button>
<button onclick=”document.execCommand( ‘copy’,false,null);” title=”copy Text”>copy</button>
<button onclick=”document.execCommand( ‘paste’,false,null);” title=”paste Text”>paste</button>
<button onclick=”document.execCommand( ‘cut’,false,null);” title=”cut Text”>cut</button>
<button onclick=”document.execCommand( ‘undo’,false,null);” title=”undo”>Undo</button>
<button onclick=”document.execCommand( ‘redo’,false,null);” title=”redo”>redo</button>
</fieldset>
<fieldset class=”editor” contenteditable=”true” name=”message”>
My Text Editor…
</fieldset>
</body>
</html>
With the above sample code, you should be able to get a simple text editor.
You can also get more functions from HERE to add more functions to your editor
Leave a Reply